Let’s say you are on a trip and want a secure connection while you check your e-mail or you want to have secure access to home computers. Let’s say you work in a corporate environment where the network admin is overzealous with connection rules and you want to access restricted sites (though tempering with those rules can get you fired). Let’s say you live in a shithole country like I do and want to access Pandora, Spotify or Hulu. That’s where SSH tunneling comes into play.
First you need some kind of SSH server. You can use a free or paid service that offers SSH services (like silenceisdefeat.com), you can run it on your home computer (any OS) or have a router that has an SSH server. In my case, I have a really nice Linksys WRT54GL router with Tomato firmware on it and its SSH server works pretty well and it’s also cost efficient.
About router configuration and port forwarding
Normally SSH runs on port 22, but it’s somewhat unwise to leave it open on the WAN side. For example if you run your SSH server off off a Windows machine with freeSSHd, it will run on the machine’s IP and on port 22 inside your LAN. Now you need to forward that port to the internet so you can access the SSH server remotely from outside. The screenshot is from a WRT54GL, but it should be similar on your router too.
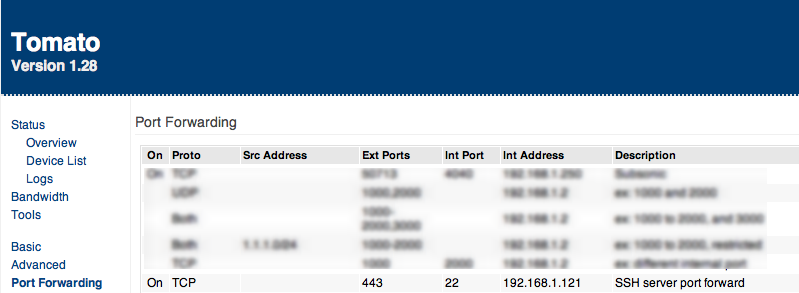
Now that we forwarded port 443 to the internet (you can choose any random port to forward port 22 to), we know that we can access our server from that port. We also need to have some means to access our home router from the internet. Most likely you have a dynamic IP allocated to you by your ISP, so we have to nail that IP somehow. The most straightforward method is to use a service like dyndns.com, a free DNS service that can translate your allocated IP to an address you can easily remember (ex. testssh.someserver.com). You need to set this thing in your router once and then it updates your associated IP automatically. Look for DDNS (Dynamic DNS) setting on your router or something similar. In this example we would access our server at testssh.someserver.com:443
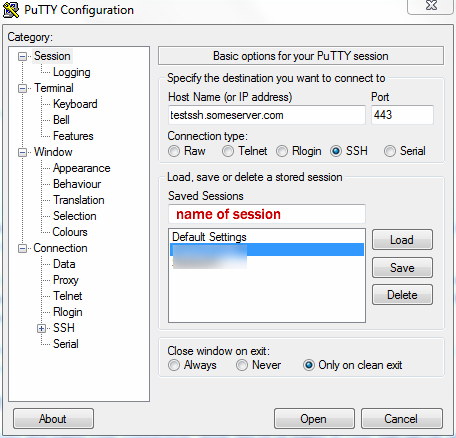
When the SSH server part is out of the way, you need an SSH client to access the server remotely. If your client machine runs Mac or Linux, you don’t have to worry, because the SSH client is built-in. If you are on Windows you need a neat little program like PuTTY.
The Windows way – setting up PuTTY
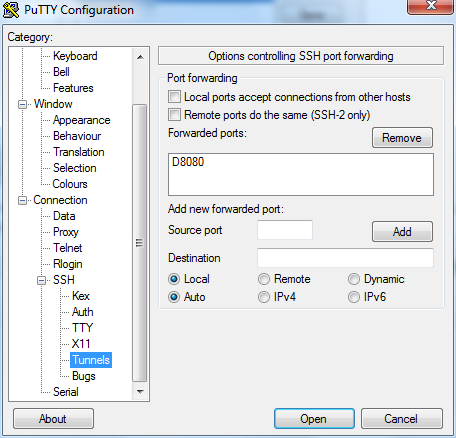
Now go to SSH and select tunnels there. Type the port number you want your tunnel to work on in the source port field, select Dynamic and click Add, go back to Sessions menu and click Save to save the connection. If you go back to the SSH menu, it should look like this – I have chosen port 8080 for my tunnel:
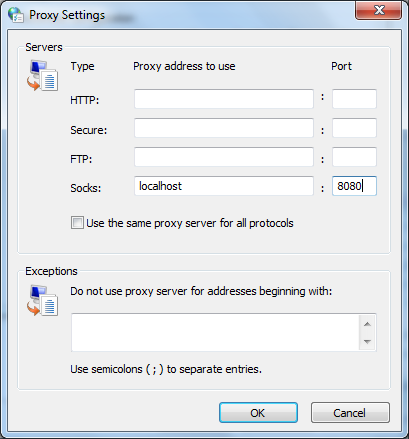
If you happen to be behind a firewall, you may need to specify a proxy setting also for things to work, this can be done in the Proxy menu on the left. So now that we configured our client we test the connection and open the SSH tunnel – click on Session > Open in putty. The server will ask for your username and password in a terminal window. Log into your SSH server and the tunnel is open. Do not close the PuTTY window as with closing it, you close the tunnel also. Now that we have the tunnel, it’s time to configure our system to use it. You can apply it system-wide from Internet Options, going to Connections -> LAN settings -> Advanced and configuring the SOCKS proxy (enter localhost and the port you chose in PuTTY’s Tunnel settings):
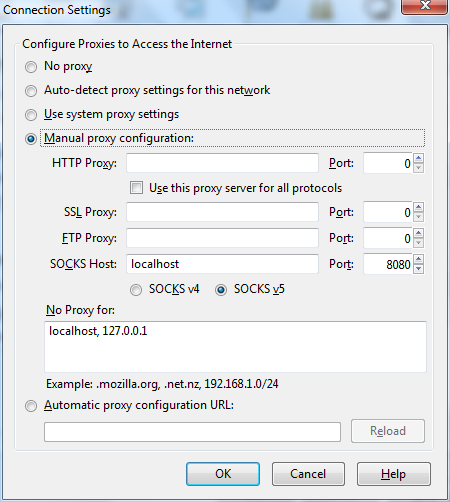
You can also use the tunnel in a browser that you only keep for this purpose (so your environment still works, but you can visit restricted sites). In Firefox it would look like this:
SSH Tunnel on Mac OS X / Linux
If you are on Mac OS X or Linux then it’s nothing more to do then fire up a Terminal window and type:
ssh -D 8080 -C -N [email protected]If you need to specify a remote port other than the default port 22 (like in our example above) we add the -p switch while specifying the port :
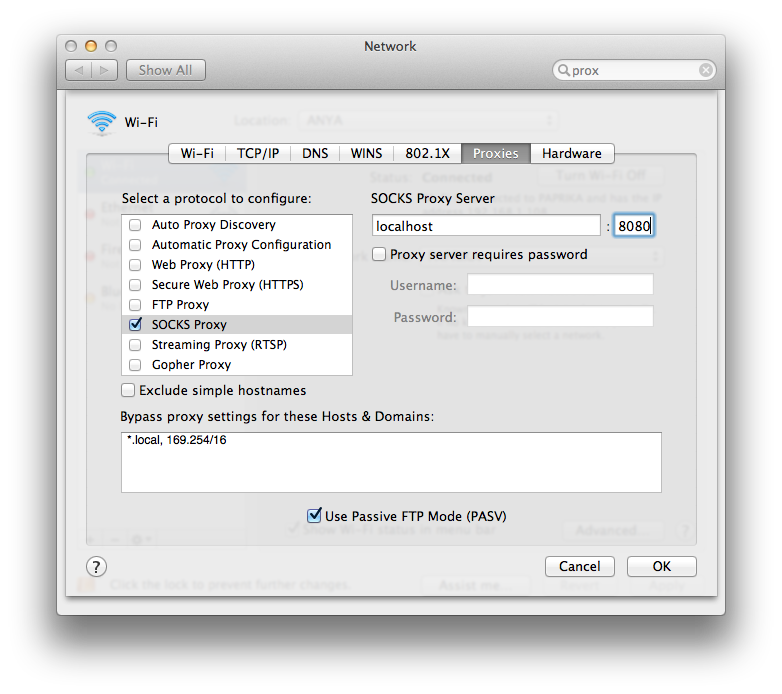
ssh -D 8080 -p 443 -C -N [email protected]The -C (compression) switch is useful if you are on a modem or bad connection, otherwise drop it. The -N switch is useful for port forwarding (doesn’t allow remote execution), like in our case. The rest of the configuration goes just as in Windows for browser settings. For system-wide usage go to Proxies in System Preferences and set it there.
As you can see you can use the tunnel for any means you see fit, basically once you open up the SSH tunnel and tell your system to use it, it’s like you are in the LAN you open the tunnel to – this means that if you download something, it will use your home bandwidth also (assuming your SSH server runs on your home network).